I was hoping to get more blogging done this year but it looks like that'll have to happen once we've settled into our new place. My husband and I have been thinking of moving closer to his work for quite some time now becauce he spends far too much time traveling everyday. Our area of choice has been Pinelands from the start as it's an easy distance to his work and my parents and granny lives there :)
So a few weeks ago we went to view a place, liked it very much and now we're moving at the end of Feb. Needless to say my days have been filled with decluttering, sorting, packing, cleaning etc.
We're very excited cause we'll be a 5 minute walk away from my parents' house, a 10 minute drive away from Andy's cousin and best friend, Jude, who is the same age as Andy, and we're right across the street from all the shops and the library!!! So instead of having to buckle the kids up into the car and try entertain them both on the journey I can take the pram and be at the library in probably under 2 minutes!
I have a ton of stuff to blog about but no time to do it in so once we're settled in I'm hoping to have a bit more time to start recording once again what we are doing for homeschool.
Until then...
xxx
Wednesday, February 16, 2011

Wednesday, January 26, 2011
'Digesting' 2011
I am not going to attempt making excuses for not blogging in the past month because we all know 'life' happens, and sometimes in such abundance that time for blogging is non existent. My husband was on leave for more than a month so life has been a busy whirl of outings, holidays, cooking gorgeous food, eating gorgeous food and spending loads of time with the family. We started off our holidays with going to the annual homeschool camp for three days and then two weeks later we went camping again for a week. Christmas day I spent at home cuddling Jane who had an awful tummy virus and the boys spent Christmas by my husbands family. We had a gorgeous Sea Side holiday at Paternoster in early January and it was by far one of the best holidays ever!!!

Andy experienced his first time eating crayfish. He really enjoyed it, especially getting the meat out of the legs...

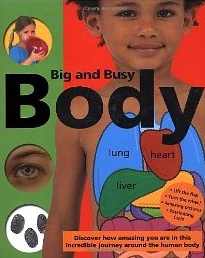
So our school year has officially started as of last week. My husband is back at work and our lives are back to the normal routines. We started by decluttering and tidying Andy's room so that it's neat and stream lined for clear thinking and fun times. In between doing this we've started studying the human body and Andy is fascinated. I find he's at such a nice age now where he can start understanding and appreciating the way the human body works. This morning he chose fresh fruits for breakfast and when he ate a nectarine the skin was a bit sour. Usually he would eat the flesh and leave the skin but he asked me "Mommy, is the skin healthy?". I explained to him that all parts of the fruit contains nutrients and without another word he ate all the skin and flesh and continued eating his other fruit. I find it so beautiful because we've been studying the digestive system and he's been very fascinated with the journey food takes through our bodies and the way our bodies use what it needs out of the foods we eat. He's been very conscious of making healthy decisions about the foods he eats with the only help from me being the answers to his questions whether the food is healthy or not. I believe this is the foundation to a healthy lifestyle and food choices for his childhood and adult life. We have such a HUGE responsibility because what we instill in them now as children makes a huge impact whether they will make healthy choices or not for the rest of their lives!!! Here is the book I bought which has been such a great tool in teaching Andy about the body...
In the next few blog posts I would like to share a glimpse into our weekly homeschool activities and subjects and a few other things that I've been thinking of blogging about but never got the time to sit down and do it :-)
Happy learning! And remember, have FUN!

Andy experienced his first time eating crayfish. He really enjoyed it, especially getting the meat out of the legs...

So our school year has officially started as of last week. My husband is back at work and our lives are back to the normal routines. We started by decluttering and tidying Andy's room so that it's neat and stream lined for clear thinking and fun times. In between doing this we've started studying the human body and Andy is fascinated. I find he's at such a nice age now where he can start understanding and appreciating the way the human body works. This morning he chose fresh fruits for breakfast and when he ate a nectarine the skin was a bit sour. Usually he would eat the flesh and leave the skin but he asked me "Mommy, is the skin healthy?". I explained to him that all parts of the fruit contains nutrients and without another word he ate all the skin and flesh and continued eating his other fruit. I find it so beautiful because we've been studying the digestive system and he's been very fascinated with the journey food takes through our bodies and the way our bodies use what it needs out of the foods we eat. He's been very conscious of making healthy decisions about the foods he eats with the only help from me being the answers to his questions whether the food is healthy or not. I believe this is the foundation to a healthy lifestyle and food choices for his childhood and adult life. We have such a HUGE responsibility because what we instill in them now as children makes a huge impact whether they will make healthy choices or not for the rest of their lives!!! Here is the book I bought which has been such a great tool in teaching Andy about the body...
In the next few blog posts I would like to share a glimpse into our weekly homeschool activities and subjects and a few other things that I've been thinking of blogging about but never got the time to sit down and do it :-)
Happy learning! And remember, have FUN!
Wednesday, December 15, 2010
Christmas presents for Andy's cousins
For the cousins' Christmas presents this year we are making DIY Bird Feeder Kits! I came across the idea of making bird feeders out of pine cones a while back but then there's the issue of peanut butter smearing everywhere so how do you store it to gift!? So I came up with the idea of making up a kit so each cousin can make his/her own feeder. :)
So if you're still looking for gift ideas here's what I did...
First make the instruction tags. I cut out squares of green card and used some pictures from a roll of Christmas gift wrap to decorate it...

Punch a hole in the top corner of each tag and write step by step instructions on the back of the tag.

Now gather your supplies. Pine cones (we collected ours when we went camping last week), Peanut butter, bird seed, ribbon (1m per kit), containers for peanut butter, containers for seeds, sandwich/or freezer bags, tags and Popsicle sticks (I thought the Popsicle stick would be the perfect size and shape to get into the grooves).

Now fill your containers with peanut butter in some and seeds in the others (we found the pill containers were perfect for the seeds).

Fill each bag with a pine cone, a container of peanut butter, a container of seeds a popsicle stick and a piece of ribbon cut into a length of 50cm. Thread another 50cm length of ribbon through the punched hole in the tag and tie the bag shut with a knot and a bow.

Now make a bird feeder with your lil' 'un. Take the Popsicle stick and smear peanut butter onto each 'spike' of the pine cone (or you can simply roll it in the peanut butter and then roll it in the seeds). Cover the p. butter with the seeds. Tie one end of the ribbon round the top and the other end round a branch in your tree.

Happy bird watching and Merry Christmas! :)

I linked this to:
ABC and 123 Show And Tell
Christmas Sharing Time
So if you're still looking for gift ideas here's what I did...
First make the instruction tags. I cut out squares of green card and used some pictures from a roll of Christmas gift wrap to decorate it...

Punch a hole in the top corner of each tag and write step by step instructions on the back of the tag.

Now gather your supplies. Pine cones (we collected ours when we went camping last week), Peanut butter, bird seed, ribbon (1m per kit), containers for peanut butter, containers for seeds, sandwich/or freezer bags, tags and Popsicle sticks (I thought the Popsicle stick would be the perfect size and shape to get into the grooves).
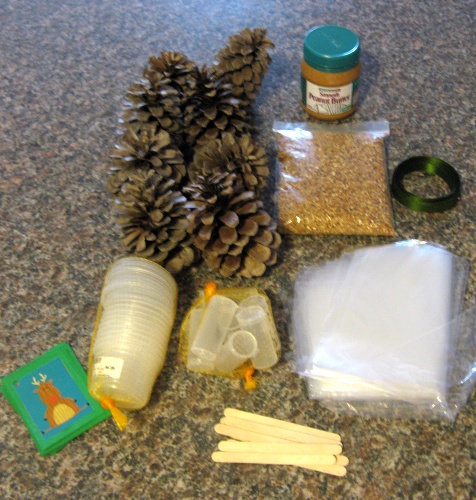
Now fill your containers with peanut butter in some and seeds in the others (we found the pill containers were perfect for the seeds).
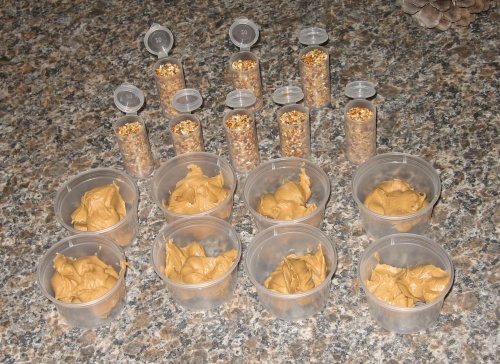
Fill each bag with a pine cone, a container of peanut butter, a container of seeds a popsicle stick and a piece of ribbon cut into a length of 50cm. Thread another 50cm length of ribbon through the punched hole in the tag and tie the bag shut with a knot and a bow.

Now make a bird feeder with your lil' 'un. Take the Popsicle stick and smear peanut butter onto each 'spike' of the pine cone (or you can simply roll it in the peanut butter and then roll it in the seeds). Cover the p. butter with the seeds. Tie one end of the ribbon round the top and the other end round a branch in your tree.

Happy bird watching and Merry Christmas! :)

I linked this to:
ABC and 123 Show And Tell
Christmas Sharing Time
Holiday Baking
Yesterday Andy and I felt like baking so in the morning while I was busy with breakfast I quickly made a batch of sugar cookie dough and kept it in the fridge till we were ready to bake it later when the housework and other activities for the day was done.
First we cut out gingerbread boys and girls and stars with our cookie cutters and decorated them with choc chips and other sprinkles...

Then when they were baked and cooled I put different colour butter icing in bags and snipped the tip to make it into a piping bag. To get white butter icing use the white wooden spoon margarine not the yellow marg. We used white for the facial features and hair and red and blue for the clothes..


But got a little carried away with the excitement of icing...

So Mommy had to doctor them a little to avoid hectic hyperactivity...

And then of coarse we ate them...

It was my dad's birthday 2 weeks ago so for the fun of it we thought we'd try our hand at decorating cupcakes in a special way - not just icing and sprinkles. We were first inspired to be more adventurous with cup cakes when our neighbour blessed us with the most gorgeous gift of gorgeous cup cakes a few weeks ago. So we found this video and just HAD TO make these super cute sunflowers for my dad's birthday. The middle is made with oreo's which give the perfect colour and hight and we made the ladybird's out of mini smarties...

To give the petals that variegated, realistic look you put yellow on one side of the piping bag and orange on the other so the two colours pipe out together.

Hope everyone else is also having fun in the kitchen these holidays!
First we cut out gingerbread boys and girls and stars with our cookie cutters and decorated them with choc chips and other sprinkles...

Then when they were baked and cooled I put different colour butter icing in bags and snipped the tip to make it into a piping bag. To get white butter icing use the white wooden spoon margarine not the yellow marg. We used white for the facial features and hair and red and blue for the clothes..


Andy iced his own ones...

But got a little carried away with the excitement of icing...

So Mommy had to doctor them a little to avoid hectic hyperactivity...

And then of coarse we ate them...

It was my dad's birthday 2 weeks ago so for the fun of it we thought we'd try our hand at decorating cupcakes in a special way - not just icing and sprinkles. We were first inspired to be more adventurous with cup cakes when our neighbour blessed us with the most gorgeous gift of gorgeous cup cakes a few weeks ago. So we found this video and just HAD TO make these super cute sunflowers for my dad's birthday. The middle is made with oreo's which give the perfect colour and hight and we made the ladybird's out of mini smarties...

To give the petals that variegated, realistic look you put yellow on one side of the piping bag and orange on the other so the two colours pipe out together.

Hope everyone else is also having fun in the kitchen these holidays!
Tuesday, November 23, 2010
Animal Hospital
Andy chose this activity out of The Rainy Day Book by Jane Bull.
He painted a medium sized cardboard box yesterday so this morning we made the door out of the cut off flaps of the box opening.

The latch...

Putting his doggie toy in the pet hospital for some special TLC... I've had that dog since I was two :)

He took a bowl and put some scraps of wool yarn for Dog's special food...

:)
He painted a medium sized cardboard box yesterday so this morning we made the door out of the cut off flaps of the box opening.

The latch...

Putting his doggie toy in the pet hospital for some special TLC... I've had that dog since I was two :)

He took a bowl and put some scraps of wool yarn for Dog's special food...

:)
Monday, November 22, 2010
Felted Soap project made easy for kids...
Andy really enjoyed this activity. We're making lots more for Christmas presents. It's so great that Andy can make his own useful presents for his cousins.
Take some pure wool roving (can be purchased at your local yarn store) and a piece of soap and cover the soap with thin layers of roving alternating the direction of laying the fibers until the soap is covered with a few layers (about 3 or 4). It's fun to use different colours.

Slightly wet it with hot water so the fibers stick a little better to the soap then put it into a plastic bag making a knot near the soap to close the bag (I used a see-through small freezer bag - you could also use a zip lock bag). Doing this makes it much easier for kids because the fibers shifts a lot in the beginning before it starts felting and the bag helps keep it in place on the soap.
You then let your child rub it vigorously as much as they want. After doing this for a while I like to shock the fibers to help it felt easier so we took it out the bag and got a glass bowl of hot water. We then put the soap under a a running tap of cold water and then briefly dipped it in the hot water before placing it back into the bag to rub again. The sudden cold water wash shocks the fibers into locking tighter together as does the combination of rubbing (agitation), soap and warm water. Do this procedure a few time (about 3 or 4) until the felt is dense and to your satisfaction. Wash the 'foam' off with cold water and roll in a towel or some roller towel (kitchen paper towel) to get the excess water out and leave over night to dry.
Our dried soaps... (I like the way Andy arranged his soap to be purple on the top and bottom and green round the sides)

How to use: Wet it when bathing or showering and work up a bit of lather then rub on your skin as you would a cloth or sponge.
Take some pure wool roving (can be purchased at your local yarn store) and a piece of soap and cover the soap with thin layers of roving alternating the direction of laying the fibers until the soap is covered with a few layers (about 3 or 4). It's fun to use different colours.

Slightly wet it with hot water so the fibers stick a little better to the soap then put it into a plastic bag making a knot near the soap to close the bag (I used a see-through small freezer bag - you could also use a zip lock bag). Doing this makes it much easier for kids because the fibers shifts a lot in the beginning before it starts felting and the bag helps keep it in place on the soap.
You then let your child rub it vigorously as much as they want. After doing this for a while I like to shock the fibers to help it felt easier so we took it out the bag and got a glass bowl of hot water. We then put the soap under a a running tap of cold water and then briefly dipped it in the hot water before placing it back into the bag to rub again. The sudden cold water wash shocks the fibers into locking tighter together as does the combination of rubbing (agitation), soap and warm water. Do this procedure a few time (about 3 or 4) until the felt is dense and to your satisfaction. Wash the 'foam' off with cold water and roll in a towel or some roller towel (kitchen paper towel) to get the excess water out and leave over night to dry.
Our dried soaps... (I like the way Andy arranged his soap to be purple on the top and bottom and green round the sides)

How to use: Wet it when bathing or showering and work up a bit of lather then rub on your skin as you would a cloth or sponge.
Wednesday, November 17, 2010
Rubber Stamp people
We recently got a great art book out the library. I like to give a book to Andy and ask him to choose which craft he wants to do so this time he chose rubber stamped people. It was fun and of coarse I joined in to experience the fun with him.
You literally take a rubber (pencil eraser) and cut it into the following shapes...

Then you take strips of paper and a sponge with some black paint on and stamp the body parts in different directions for fun little men. I just cut the top off of a kitchen sponge and used it for the paint. The only black paint we had was fabric paint (which I bought for painting the face onto a rag doll for a family members sewing project) which worked perfectly.

He asked me to make stamps for a car so I cut those out too...

With this masterpiece he smudged a stamp to create a ... Spaceship!

We used bits of his art and some imagination to make a birthday card for one of his cousins' up coming 8th birthday...

And we made another card with scrap pieces of scrapbook paper, beads and felt for the sister of the cousin who's turning 8 so she won't feel left out...

You literally take a rubber (pencil eraser) and cut it into the following shapes...

Then you take strips of paper and a sponge with some black paint on and stamp the body parts in different directions for fun little men. I just cut the top off of a kitchen sponge and used it for the paint. The only black paint we had was fabric paint (which I bought for painting the face onto a rag doll for a family members sewing project) which worked perfectly.

He asked me to make stamps for a car so I cut those out too...

With this masterpiece he smudged a stamp to create a ... Spaceship!

We used bits of his art and some imagination to make a birthday card for one of his cousins' up coming 8th birthday...

And we made another card with scrap pieces of scrapbook paper, beads and felt for the sister of the cousin who's turning 8 so she won't feel left out...

Subscribe to:
Posts (Atom)